Guides > Blender > Import and export
Updated on 12 Mar 2023
Inglese:
When using Blender in combination with other software or exporting your projects to Solido+, it's important to learn how to import and export models. There are two situations where you'll need to use these functions:
1. If you've created your project in another software and want to optimize it with Blender.
2. If you've created your project in Blender and want to export it to upload to Solido+.
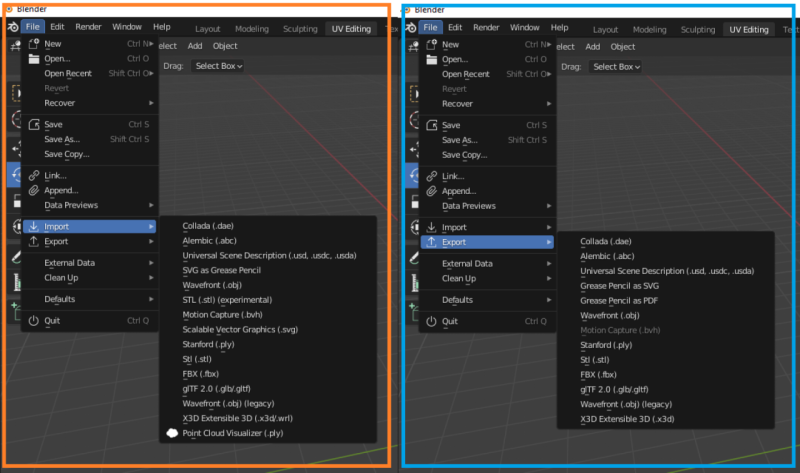
In both cases, you can use Blender's import and export functions. Simply go to the File tab, select Import or Export, and choose the desired format. This way, you can make the most of Blender's features and get the most out of your 3D modeling experience.

"Ideal formats for uploading to Solido+ are .obj, .glb, .gltf and .fbx. However, in this guide, we'll show you specific export parameters for the .glb format, as it allows you to incorporate models and textures into a single file and get the most optimization.
.glb Export
Here's a quick guide on how to export an optimized model in .glb format from Blender:
1. Open your Blender project and make sure you've finished all model adjustments.
2. Select the model you want to export. If you want to export the entire scene, skip this step.
3. Go to the File tab in the main toolbar and select "Export."
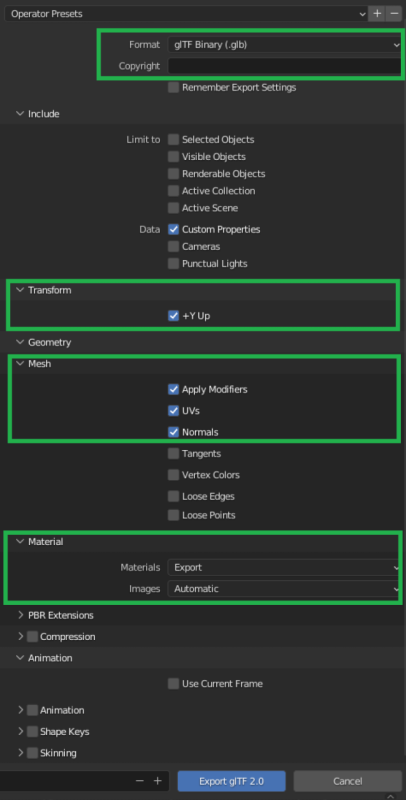
4. In the export menu, choose "glTF 2.0" as the export format.
5. In the "Transform" section, make sure the "+YUp" box is selected. This will ensure the correct axis orientation.
6. In the "Mesh" section, make sure the "UVs, Normals, and Apply Modifiers" boxes are selected. This will ensure that all geometric data of your model is exported.
7. If you want to export textures as well, select the "Include Texture" box.
8. Select a destination folder to save your glb file and choose an appropriate file name.
9. Click on the "Export glTF 2.0" button to start the export process.
After the export process, your model will be available in glb format, ready to be uploaded to Solido+.

Assistance center
info@solidoplus.com
+39 0372 808043
From Monday to Friday
9:00 - 12:00 | 15:00 - 17:00
@2023 Solido+ | Contact us | Privacy Policy | Cookie Policy | Terms and Conditions
A product of PowerMOB srl | P.IVA 01654140191 | REA CR - 190890 | CS €12.000,00 iv